Banner For The Bedroom

I have been loving all the banners people have posted on Pinterest, and was trying to figure out where I could put one. I decided on our bedroom.

In our old house we had a bench with bins and a matching shelf with pegs. This is were the kids backpacks, jackets and shoes all lived. I loved it!


In our new house we had this amazing built-in put in and the kids backpacks, coats and shoes have a new place to live.


I no longer need the bench and shelf but I love to re-purpose items and hated to get rid of them. The bench now sits at the foot of our bed and I am in the process of finding new bins to match our color scheme as well as a new cushion for the bench. 


I had my husband hang the shelf on the wall. I began going through my decor trying to find pieces I already had to decorate with, and then it dawned on me this would be the perfect place for a banner. I knew I would also be able to bring my pop of yellow that I wanted in the room in the banner and in the decor for the shelf.


Wa-la! Because all the spring items are in the stores right now I was able to score on the yellow flower arrangement. The plate and candle stick holders I had. On a trip to Hobby Lobby I came across the candles and knew I had to have them since they matched my bed. The grey and black bin is part of the linen collection that I won from Office Depot (still not sure what treasures I will keep in there) and I added the greenery as fillers for now. All that is missing is the paint on the wall - I'm trying to be patient about that and wait to paint after our year walk thru when they come back in to patch all the cracks and nail pops.


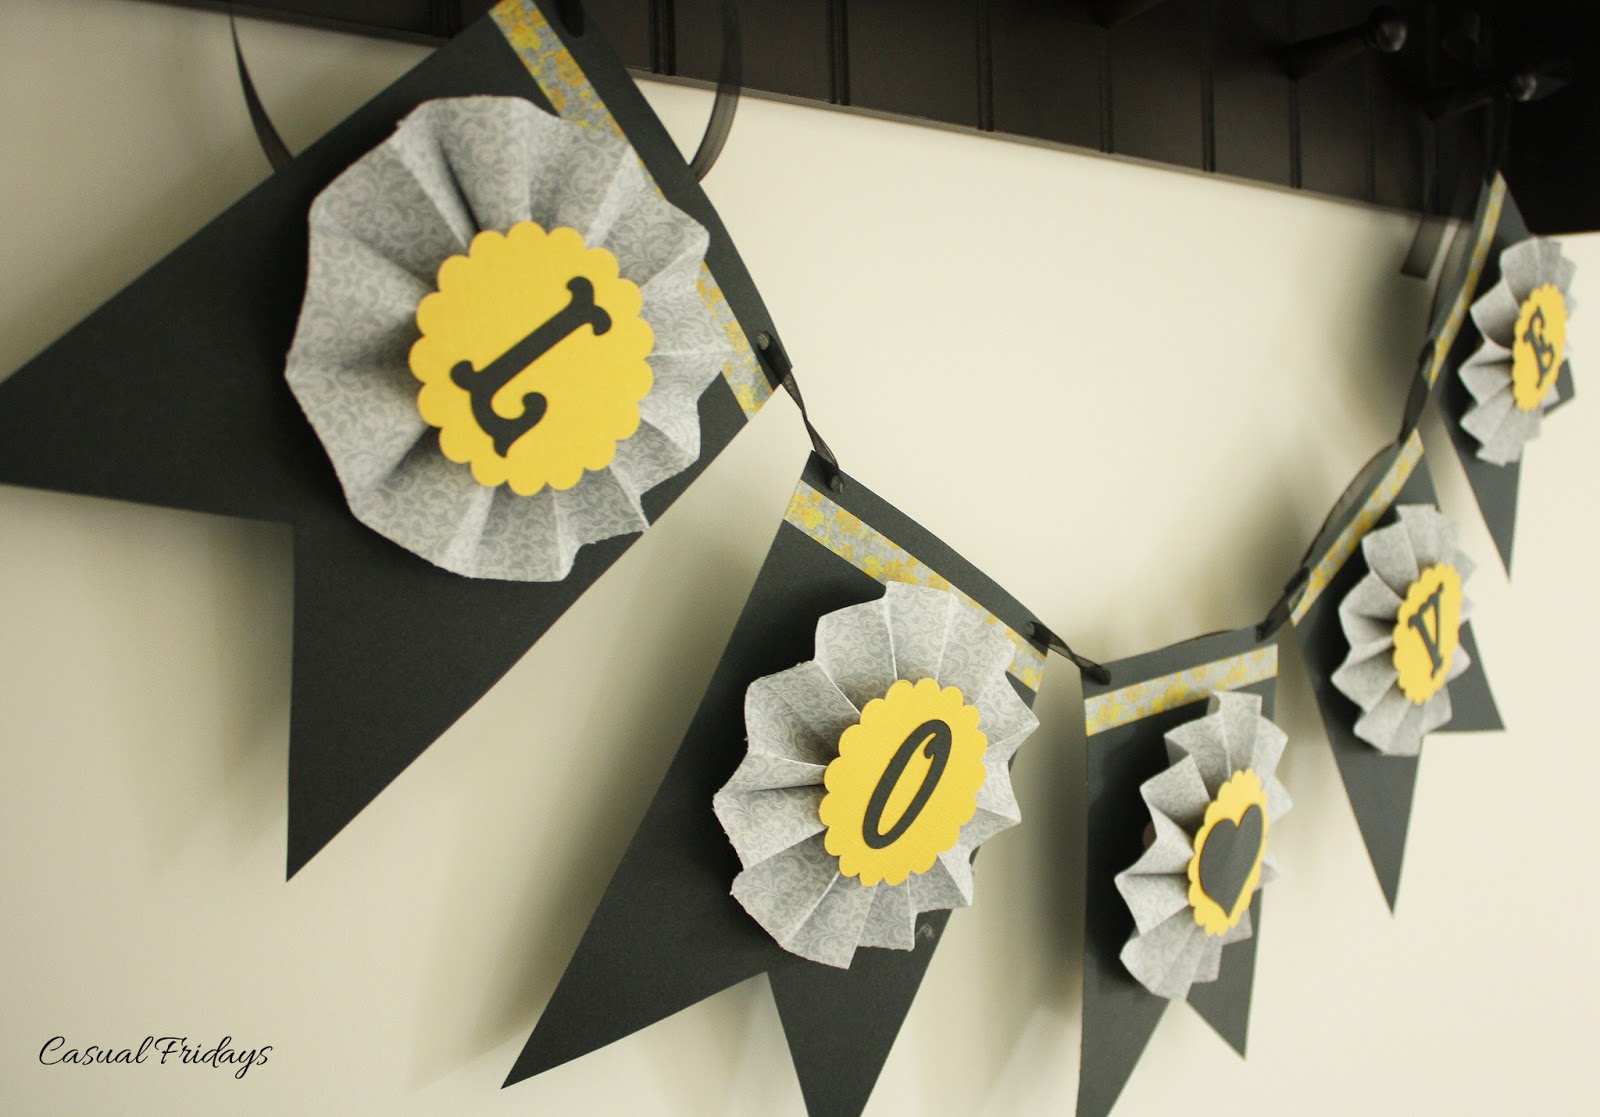
For the banner I created a template for the flag and traced it onto black cardstock. I added my favorite Washi tape at the top. I then bi-folded 2.5 inch strips (2 strips per flower) and hot glued them together. I punched a 2.5 flower for the yellow flower and hot glued that to the grey flower. I also punched a 2.5 flower for the back of the grey flower so it would be easier to attach to the black flag. I then used my Cricut to cut the letters and since love is only four words I decided to add a flag in the middle with a heart as I always decorate in odd numbers. I grabbed some sheer black ribbon I had on hand and strung it up. When I walk into my bedroom 
I truly "LOVE" how this project turned out!

Leprechaun Mischief - Day one

Both my kids are way into catching a leprechaun this year. They are both learning about St. Patrick's Day and are coming home from school asking if we can build a trap to catch a leprechaun. So after some google searching and a search on Pinterest I found some great ideas on the mischief that a leprechaun can do. I decided to start this tradition with the boys by the leprechaun causing mischief a week before St. Patrick's Day. I started today with this one I found at Differentiated Kindergarten. Hop on over to the blog to find out how to make the feet.


Recipe Binder!!

Do you ever feel like you are making the same meals over and over again? I was in this funk. We have our family favorites, our quick meals, and our "oops I forgot to thaw the meat" meals. I have been reading some of my favorite blogs for meals, searching online and looking on Pinterest. I have found some great meals and have been trying several out, but my recipe binder was in desperate need of a make-over. Plus all the new recipes I was printing out were being thrown into the cabinet.

I knew the first thing I wanted to do was find some cute, colorful binders. I scored these at Target and also picked up some new tabbed dividers. I of course had to add some Washi tape to the tabs.


While I was in my favorite office store, Office Depot, I found these 4x6 photo page protectors. I knew these would be perfect to slip my recipes in. Also several sites I have been printing recipes from have the option to print the recipe in a 4 x 6 format. It also has a narrow pocket great for those recipes you cut out of a magazine.


I broke out my label maker and labeled all the tabs for my categories. My first binder is all my main meals for dinner organized by the main meat in the recipe. My second binder (that I still have to finish) will be all my
 sides, salads, and desserts.

I began the project by going through my recipes, throwing out the ones that we did not oooh and ahhh over, or the ones that I never made, that sounded good at the time, but now don't sound that great anymore. I also trimmed them down. The pictures are nice to look at and can even encourage me but I felt I really didn't need them and they took up space. For my larger recipes I placed them on one sheet of scrapbook paper and slipped them into a full sheet page protector. I like using page protectors because if I splash while cooking they are easy to wipe off. 


I also added color dots to some recipes. Green dots meant the recipe was yummy, red dots meant the recipe required marination (I can't tell you how many times I went to make a recipe only to find out the meat needed to marinate for x amount of hours....grrr!) blue dots meant it was a kid favorite meal (those are hard to come by in my family) and yellow dots meant the recipe was a slow cooker or a long cook time recipe.


I also color coded my each section to help easily identify them. Plus I did not want to see the back of the recipes I cut out of magazines. I needed it to be neat and pretty! 


I put a pocket folder in the front to keep the recipes I have printed out but not tried. Once I try them if we like them I will find a home for them in the binder.


I hope you picked up some helpful tips on how to organize your recipes! I would love to see what you came up with and how you organize yours!

Happy Organizing!

TV Cart - Thinking Outside The Box!

When we moved into our new home we made sure we got the new TV but did not have the new TV cart. We thought it would be easy to find a cart we liked as there was so many to choose from.....wrong!! We found we didn't like the color, the knobs, the storage, but most of all the height was an issue for us. You see when we moved in we of course couldn't have the TV on the floor and I came home to this temporary fix that my husband came up with.


Yep.....that's my sofa table! The last 4 months I have been looking at this mess of a set up, and it was almost enough to put me over the edge! Look at all those cords!! That was screaming at me to be organized!


The remotes were driving me crazy as well. They did not have a home and ended up all over the table, our sofa, or ottoman. Also we had no where to put DVD's so a basket was holding them to at least keep them tidy.


Since a sofa table is higher than most TV carts we got used to the TV being up high. Here is were our next problem came into play. None of the TV carts we even remotely liked were high enough. To give you a sense of the height here is a picture compared to our rocker/recliner.


One day while at Costco (we really need to stay out of that place) I cut down the aisle that had the bedroom furniture. I stopped dead in my tracks as a haze lit up around the perfect TV cart and angels started to sing....ok well maybe it didn't happen quite like that but I was giddy, that's for sure! The TV cart/TV dresser is made for the bedroom and is higher, I guess because you would be watching TV from your bed. I always have to step out of the norm and instantly could picture it in my family room. Who would have thought to look at bedroom sets to find a TV cart for your family room - thinking outside the box!

 
I love it!!! The storage for the media was perfect, I love the drawers, the height was a bit higher than we wanted but loved it after a day of watching TV, and the best part...............all those cords are now neat and out of sight!! The remote and DVD's now have a home in the drawers. Another project off my to-do list!

Happy Organizing!!!


Winner Winner Chicken Dinner!

I thought I would share with you what I did with my prize that I won from the Organizing Revolution Challenge. I won first place for my organized playroom and won Joys complete home filing system. I have begun to use her tickler system.


There are 3 types of tickler systems, daily, weekly and action tickler. I choose to use the weekly system. Joys tickler files comes with downloadable tabs but I created my own with my favorite Washi tape! I have to have things bright and full of color because it makes me happy and I am more
 likely to use them. 


Here is what I took from the system: the weekly system has 5 file folders up front labeled week 1 through 5 and then 12 file folders labeled January - December. You put anything you need to do, like call on a doctor bill, make the kids dentist appointment, a card you need to send out that week....anything in that weeks folder. So in the examples above the doctor bill would have come in the mail so you stick the paperwork in the week folder, the dentist might have sent a friendly reminder that the kids are due for their cleaning so I would stick the post card in the week file. If you have something in your mind that needs to get done but no "paper" to go with it I just use a post card.


At the beginning of the week I go into the folder and see what I need to get done. If I don't get something done that week I move it to the next week. If I got a task done I move it to the "to be filed" folder at the back of my files if it needs to filed or throw it away. The monthly folders I used to put tasked that don't need to be done right now. For example the doctor reminder that comes in the mail today. Your calendar is booked for the rest of February so you would place it in March. I also put my cards that need to be
 sent out that month. 


When the month is coming to an end about 3 days before I begin to set myself up for the next months weeks. I pull my March folder and sort thru the tasks and arrange them by priority. I then drop them in the week folder I want them in. 


So far this system has been wonderful! I highly suggest it! I have been more on top of things and before I was clipping the "paperwork" to the cork board, fridge, and writing it down a gazillion times! Now I have a nice, neat place to keep all that important "paperwork" and it is helping me stay on top of it!

Washi Tape - I LOVE, LOVE it!!

Washi tape! Have you seen it? Have you used it? For those of you who don't know what Washi tape is, the best way I can describe it would be to compare it to masking tape, but with a pretty color or design on it. It is also some what transparent, and the best part about Washi tape is it is removable and can be re-positioned if you didn't tape it down just right. 

Washi Tape Organizer - Wood Masking Tape Holder - Eco friendly Japanese Tape Dispenser for 48 rolls - coworkers gift - under 50

I had to see what all the hype was with this tape. I bought my first rolls at Target (they sell 4 rolls in a pack for $4.00!). I was hooked and began to go on a hunt for more colors and styles! I was some what disappointed that my local craft stores and big name stores did not have the tape or had a very little selection. So I went to my trusty friend Google! Wow! There are hundreds of sites that sell Washi tape! 


My next thought was "What do I do with this?" I began to play with it on my own and also looked at Pinterest for ideas. I began to get carried away with it and I do believe I now have a Washi tape addiction!


I used it on my tickler file folders (they are so pretty now). I just added the tape on the folder file and trimmed it. Then I used my label maker with clear tape!


I label the bazillion cords we have. Now when I am looking for my iPhone charger, tablet charger, or camera charger they are easy to find. I wrapped the tape around the cord and just used my label maker again. My boys are starting to have electronic gadgets, and I will be labeling their cords with their names so my cords don't disappear!


I had a small scrapbook album that I could not decide how I should design the cover.....insert Washi tape here!!! I just wrapped several pieces around the cover.

We had some friends coming over and I decided to make cupcakes. Of course I remembered seeing the cute flags for food on Pinterest so I had to do that. I wrapped the tape around a toothpick, trimmed the end to make it look like a flag and then punched up a few Valentines Day words on my label maker to slap on my flags!


I labeled my caddy that holds all my daily pens, scissors, dry erase cleaner and markers and post it notes


I am currently working on re-doing my recipe binder (post to come later on this!) so of course I wanted my tabs to look pretty!

 
I am constantly finding new ways to use this awesome tape! My question to all my Washi tape lovers out there is how are you storing your tape? I don't have many now so I am using this 3 layer snap case but I know I will be out growing that soon!


Happy Organizing!

Subway Art

I am loving the subway art I have found around the internet and seen in stores. I wanted to share this site with my readers today as these ladies make amazing subway art and the best part, they are super generous and let you download them for free! Their blog is one of my favorites as they have wonderful ideas so take a spin around it when you are there! They are the ladies of of eighteen25!

I printed their Valentines Day subway art, framed it, added a few hearts on the frame, and put it up! I love it....perfect for my Valentine's Day decor!


Here are some of their other awesome designs! Click HERE and it will take you to their site to download. Don't forget to leave them some love!


ENJOY!!