Showing posts with label Scrapbooking. Show all posts

Handmade Christmas Cards

This year I made my Christmas cards. I have done this before, and I love to do it, but you have to have some time on your side. I have over 50 cards that I send out! So doing the same card 50 times was just not an option for me. I knew I would get bored fast.

I found my cards at Hobby Lobby and loved that they had some chevron prints in the mix. I can never get enough chevron in my day! Then I used a mix of Cricut cartridges and cuts on Sure Cuts a Lot to make the pieces of my cards. 


Here are all the cards I made. I hope you get some inspiration from them! 


Merry Christmas!!!

Christmas Planner!!!

Christmas is only 48 days away! I cannot wait! Christmas is my FAVORITE holiday. I am one that puts up the trees and listens to Christmas music way too early. I just get giddy about the holiday. I am rubbing off on my kids too as they have been singing Christmas songs and keep asking when we can put the tree up.

The holidays get hectic for me. The older the kids get the more holiday events we attend. I need to be organized in order to have a stress free holiday. I have been using a Holiday Planner for 4 years now. My first year I used one from Organized Christmas. They had several different types of planners with several free printables. Year two I used some of my printables from Organized Christmas and made a few of my own. Year three I found several bloggers with free holiday printables and pick various forms that suited me, but I hated that they didn't all match or have a theme. This year I thought I would create my own based on the past three years printables. Well time was getting the best of me so I went in search of a Christmas Planner in blog land.

The angels began to sing when I visited one of my absolute favorite bloggers, A Bowl Full of Lemons!!! Toni has created the most amazing holiday planner with everything you need to stay organized this Christmas! She does charge a minimal fee for her planner but it was worth every penny spent!


My planner set-up

I print all my pages on white card stock because it is more durable then regular paper and I love to use Sharpies! The card stock prevents the bleed thru from the pens. I purchased a three ring binder, printed my cover page, and slapped it in. I was already happy!

The very next thing in my planner is my calendar. I have a calendar for November and December. The calendar helps me plan out when I am decorating, all our holiday events, when the kids are on holiday breaks and more. I downloaded my calendar from Eli Blog. You can get it here.


I just loved how they had that Subway Art feel to them.

The next item in my planner is just a 3 hole punch poly pocket to keep loose items in. I put coupons, Christmas lists, notes and more in there.  I also put two envelopes in the pocket to hold my gift receipts and shopping receipts. I even gave the front of the envelopes a Christmas feel - it makes me smile when I pull them out! I then put tabbed dividers in and used my label maker to label each tab.


Tab One:
My first tab in my planner is my shopping tab. I love how Toni's holiday shopping list is set up. There is are so many more items to purchase then just gifts at Christmas. I now have a place to jot down any new decorations I need to pick up, Christmas card items, wrapping items, and a spot for miscellaneous items to purchase. I then have her Black Friday shopping form. I usually go shopping on black Friday (more for the fun then anything) but I now have a spot to jot down the store, the item I need, the price, and the time frame to get the item. So important to stay on task on that big shopping day! I use her Gift Giving list to keep track of those non-family gifts to give - teachers, neighbors, friends.


Tab Two:
The second tab is my budget for gift buying. My husband and I sit down every Christmas and set our budget for each family member, each other, our kids and non-family gifts. This tab is huge to me. It keeps me on budget and also gives me a place to keep track of gifts bought.


Tab Three:
The third tab is lists. The My Christmas Wish List form is a great way to let people know what your number one item is, things you want versus things you need, sizes, and more. I added a gift card list for stores that I love gift cards from too. I will also punch in the list I get from others for reference.


Tab Four:
The fourth tab is my events tab. Toni has a wonderful way to keep track of all those events to take the kiddos to around the holidays. Whenever I receive an email or find an event that we might want to go to I jot it down. I missed out on a Groupon last year for an event that I would have loved to take the kids to!


Tab Five:
The fifth tab is food! Now I occasionally host a Christmas dinner, but I will be using the Holiday Menu Plan for any event that I will be hosting during the holidays. It breaks the meal down by course and I love that it gives a spot for preparation date. There are so many things you make the day or night before your event that you need to have a plan for. I also love there is a grocery list sheet too!


Tab Six:
The sixth tab is my Christmas card list. In the past I have used a list that you are able to keep track of who you sent/received cards from for 2 to 4 years. The problem I had with that is my list is always changing. I like that Toni's is a one year deal mostly because I am anal and hated messing up my list if someone moved, lost touch, divorced, or whatever the reason may be for not sending a card the next year. You know......I like things to look pretty!!

I am a planner - I always work better when I make a plan! To find out more on Toni's awesome holiday planner or to purchase it click HERE. Happy Holidays!!  


Organizing the Boys Bathroom - Labeling Project

I have been busy working on the boys bathroom and thought I would give you a quick peek at part of the project that I have been working on. I love to make tags and label. Being that I am a digital scrapbook and I am on a creative team for Bella Gypsy I knew when I saw this kit I wanted to use the colors in the boys bathroom. 

Mama's Boy

Isn't this a great kit! You can pick it up here. I printed out some of the papers and used Photoshop to create my tags. I trimmed and matted them and then ran them through my laminator to help make them durable. 


Wa-la! Instant, colorful, tags!


Banner For The Bedroom

I have been loving all the banners people have posted on Pinterest, and was trying to figure out where I could put one. I decided on our bedroom.

In our old house we had a bench with bins and a matching shelf with pegs. This is were the kids backpacks, jackets and shoes all lived. I loved it!


In our new house we had this amazing built-in put in and the kids backpacks, coats and shoes have a new place to live.


I no longer need the bench and shelf but I love to re-purpose items and hated to get rid of them. The bench now sits at the foot of our bed and I am in the process of finding new bins to match our color scheme as well as a new cushion for the bench. 


I had my husband hang the shelf on the wall. I began going through my decor trying to find pieces I already had to decorate with, and then it dawned on me this would be the perfect place for a banner. I knew I would also be able to bring my pop of yellow that I wanted in the room in the banner and in the decor for the shelf.


Wa-la! Because all the spring items are in the stores right now I was able to score on the yellow flower arrangement. The plate and candle stick holders I had. On a trip to Hobby Lobby I came across the candles and knew I had to have them since they matched my bed. The grey and black bin is part of the linen collection that I won from Office Depot (still not sure what treasures I will keep in there) and I added the greenery as fillers for now. All that is missing is the paint on the wall - I'm trying to be patient about that and wait to paint after our year walk thru when they come back in to patch all the cracks and nail pops.


For the banner I created a template for the flag and traced it onto black cardstock. I added my favorite Washi tape at the top. I then bi-folded 2.5 inch strips (2 strips per flower) and hot glued them together. I punched a 2.5 flower for the yellow flower and hot glued that to the grey flower. I also punched a 2.5 flower for the back of the grey flower so it would be easier to attach to the black flag. I then used my Cricut to cut the letters and since love is only four words I decided to add a flag in the middle with a heart as I always decorate in odd numbers. I grabbed some sheer black ribbon I had on hand and strung it up. When I walk into my bedroom 
I truly "LOVE" how this project turned out!

Washi Tape - I LOVE, LOVE it!!

Washi tape! Have you seen it? Have you used it? For those of you who don't know what Washi tape is, the best way I can describe it would be to compare it to masking tape, but with a pretty color or design on it. It is also some what transparent, and the best part about Washi tape is it is removable and can be re-positioned if you didn't tape it down just right. 

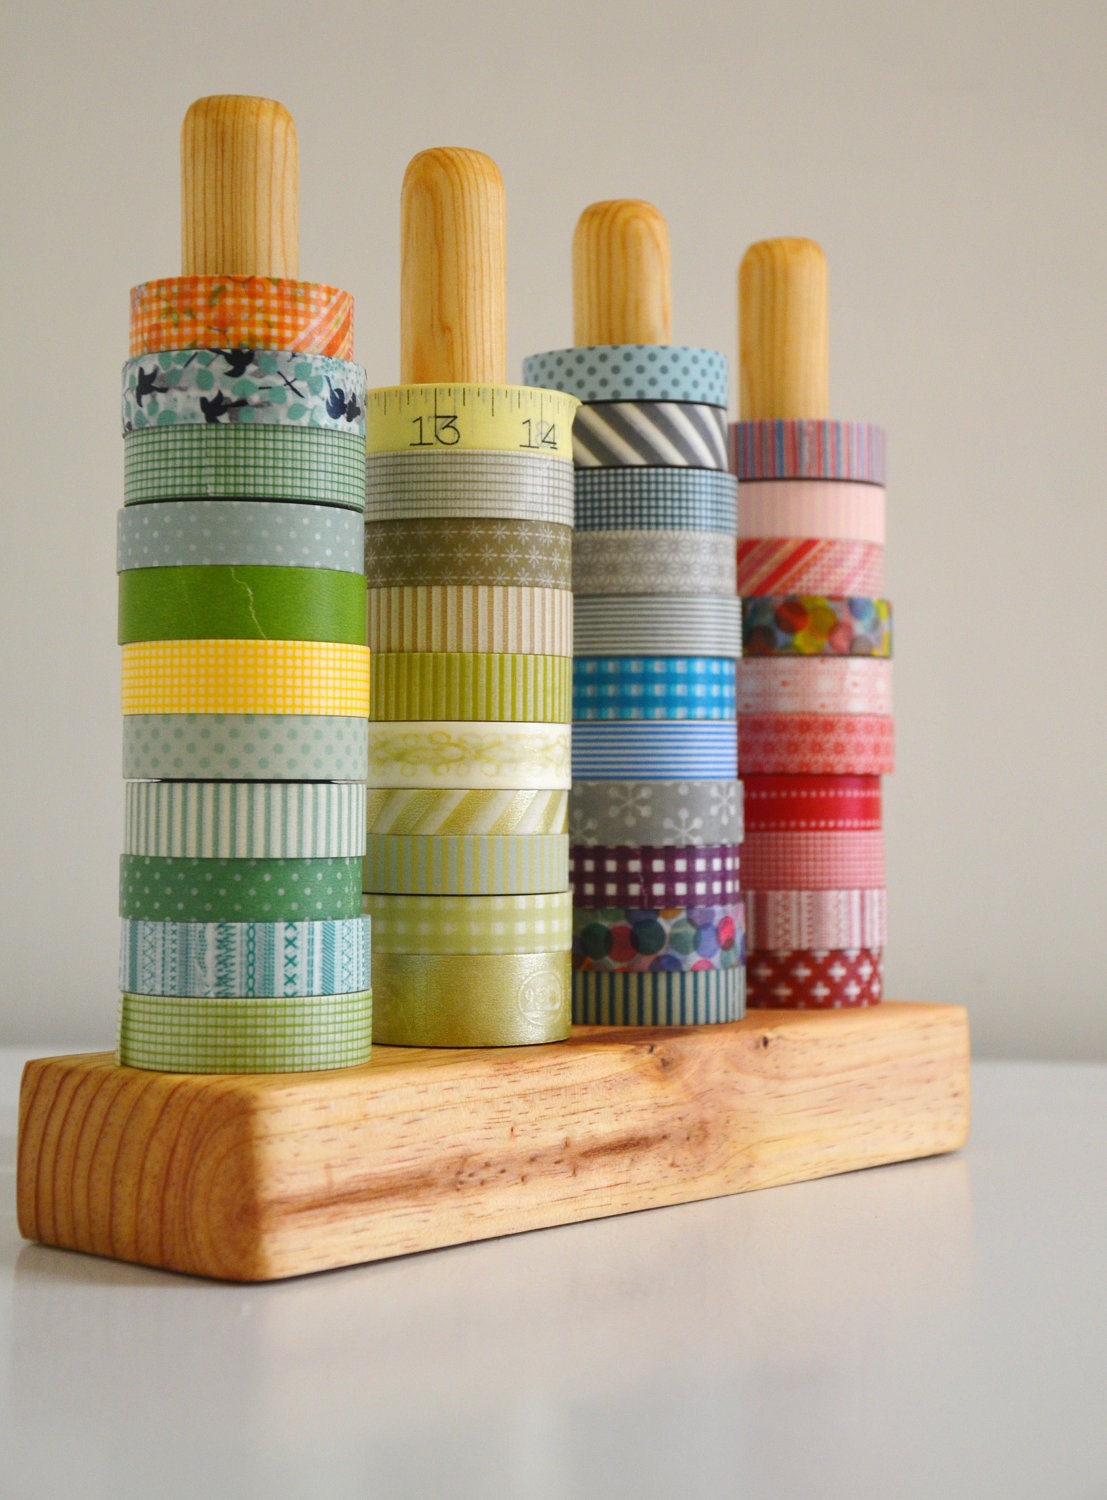
Washi Tape Organizer - Wood Masking Tape Holder - Eco friendly Japanese Tape Dispenser for 48 rolls - coworkers gift - under 50

I had to see what all the hype was with this tape. I bought my first rolls at Target (they sell 4 rolls in a pack for $4.00!). I was hooked and began to go on a hunt for more colors and styles! I was some what disappointed that my local craft stores and big name stores did not have the tape or had a very little selection. So I went to my trusty friend Google! Wow! There are hundreds of sites that sell Washi tape! 


My next thought was "What do I do with this?" I began to play with it on my own and also looked at Pinterest for ideas. I began to get carried away with it and I do believe I now have a Washi tape addiction!


I used it on my tickler file folders (they are so pretty now). I just added the tape on the folder file and trimmed it. Then I used my label maker with clear tape!


I label the bazillion cords we have. Now when I am looking for my iPhone charger, tablet charger, or camera charger they are easy to find. I wrapped the tape around the cord and just used my label maker again. My boys are starting to have electronic gadgets, and I will be labeling their cords with their names so my cords don't disappear!


I had a small scrapbook album that I could not decide how I should design the cover.....insert Washi tape here!!! I just wrapped several pieces around the cover.

We had some friends coming over and I decided to make cupcakes. Of course I remembered seeing the cute flags for food on Pinterest so I had to do that. I wrapped the tape around a toothpick, trimmed the end to make it look like a flag and then punched up a few Valentines Day words on my label maker to slap on my flags!


I labeled my caddy that holds all my daily pens, scissors, dry erase cleaner and markers and post it notes


I am currently working on re-doing my recipe binder (post to come later on this!) so of course I wanted my tabs to look pretty!

 
I am constantly finding new ways to use this awesome tape! My question to all my Washi tape lovers out there is how are you storing your tape? I don't have many now so I am using this 3 layer snap case but I know I will be out growing that soon!


Happy Organizing!

Subway Art

I am loving the subway art I have found around the internet and seen in stores. I wanted to share this site with my readers today as these ladies make amazing subway art and the best part, they are super generous and let you download them for free! Their blog is one of my favorites as they have wonderful ideas so take a spin around it when you are there! They are the ladies of of eighteen25!

I printed their Valentines Day subway art, framed it, added a few hearts on the frame, and put it up! I love it....perfect for my Valentine's Day decor!


Here are some of their other awesome designs! Click HERE and it will take you to their site to download. Don't forget to leave them some love!


ENJOY!!